How to pack a bike safely
Guest blog by Andreas Kambanis.
As the founder of the London Cyclist blog, one of the most frequent complaints I hear from cyclists is, “where do I store my bike?”
For me it's my mountain bike. I rarely use it, but when I do I talk about my trips to Swinley Forest for weeks to anyone who will listen.
LOVESPACE is a great solution for those of us without much space in our home.
If you want to send your bike to LOVESPACE, it's worth following this quick and easy guide to ensure your bike gets there and back to you, in perfect condition.
First of all, a couple of things worth noting:
- Packaging can’t exceed 1.5 metres on the longest side
- Weight should be under 25kgs
That shouldn't create any problem for most bikes.
Also, before you store your bike, make sure it is completely dry, as water can cause rust.
The tools
To prepare your bike for safe storage and transport, you will need two tools.
First of all, an Allen key. These are fairly universal, but if you don't already own one it's a trip down to your local DIY shop or bike shop.
Secondly, you'll need an open-ended spanner for removing the pedals. A common mistake people make is they use an adjustable spanner, which often slips and causes damages to the pedal and the operator of said spanner.
The box
Now that you've got the tools, the next step is to get hold of something to pack the bike with. Here are my suggestions:
- Your local bike shop may have a spare bike box lying around, that they'll happily offload on you.
- LOVESPACE sell bike boxes for £14.95 which will be delivered to your home. You can find out more on the materials page.
- Wiggle sell the DHB Elsted Wheeled Bike Bag (£69.99) - this is a slightly more jazzy solution that doesn't break the bank.
Whichever method you choose, you'll need to compliment it with plenty of well-placed bubble wrap (try not to get carried away and pop all the bubbles).
The packing process
Step 1:

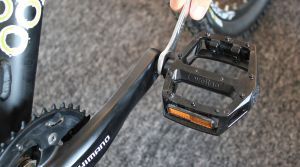
Start by removing the pedals. It's worth noting that pedals are a little strange. To remove the left one, you need to twist clockwise. To remove the right pedal, you need to twist anti-clockwise.
Fortunately, both pedals should be labeled, with a little L and R, which makes re-assembly easier.
Wrap these in bubble wrap, as you don't want them knocking other components.
Step 2:
Handlebars. You don't need to remove your handlebars, but you do need to twist them so that they fit inside the storage.
Without getting too technical there are two types of handlebar systems, threaded headset and threadless headset.
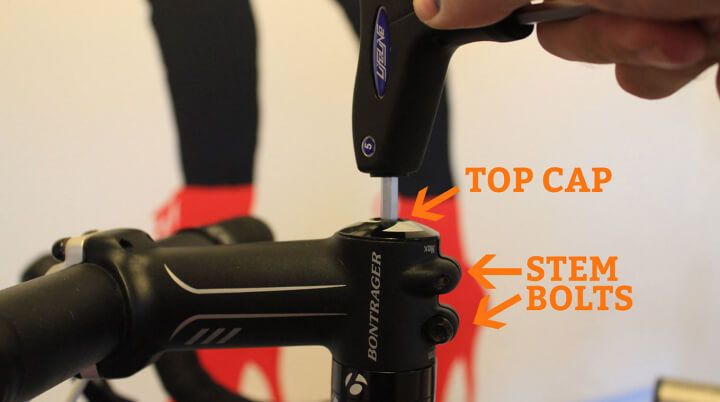
With a threadless system, which is more common in modern bikes, you need to get the order of adjustment correct.

Start by first of all loosening the stem bolts, then loosening the top cap.
When re-tightening, the top cap needs to be tightened first, followed by the stem bolts.
Threaded systems are simpler in that you simply undo the Allen Key bolt at the top to twist your handlebars.
Step 3:
Grab the tape and bubble wrap! You'll want to wrap up your bike, especially around the sensitive components. Pay particular attention to the derailleurs and exposed frame.
Step 4:
For most bikes, step 1 to 3 will be enough adjustment, but if you are using storage similar to the DHB Elsted Wheeled Bike Bag, you'll also need to remove your wheels.
Start by turning your bike upside down and resting it on the handlebars and saddle.
Unless you have disk brakes, you'll need to first release the brakes to allow the wheel to be removed.
On road bikes, there should be a quick release lever. Hybrid bikes typically have v-brakes, which can be loosened by undoing the noodle out of its nested position.
You can then undo the quick release lever or use a spanner to undo the nut.
On a rear wheel, once you've undone the brakes, pull back the derailleur and lift the wheel out.
The first time I packed my bike away like this, it took me half an hour. Nowadays I can do it in half the time and it's completely worth it for having a hallway in my house that doesn't resemble an obstacle course.
